Menus provide lists of action items that the application can perform. An
action is selected by clicking on the menu item. For those menu items
that name a submenu - all items in the Menu Bar and items with a right
arrow on their right side - selecting them will open the submenu. A
single click on a submenu item will leave the submenu open until the next
click either in the menu, which will select the item, or anywhere else,
which will dismiss the menu without any selection. Clicking and dragging
on a submenu item will hold the menu open until the dragging ends either
on the menu, which will select the item, or anywhere else, which will
dismiss the menu without any selection.
Some menu items are in the form of a checkbox that, when selected, will
toggle the state of the item - such as showing or hiding a tool - and
check or uncheck the menu item to reflect its new state. Immediate action
items occur when they are selected. Some items have a trailing ellipsis
("...") to indicate that the item will be to open an interactive dialog
to carry out the action. Some action dialogs, such as
Open
File and Save, are modal: no interaction with other parts of the
application can occur until the interaction with the dialog has been
completed at which point the action defined by the dialog will occur.
Non-modal dialogs, such as Preferences
allow interaction with the rest of the application to continue while the
dialog is displayed and actions from the dialog may be done repeatedly.
Most menu action items have a keyboard shortcut. The shortcut key
combination is listed to the right of the menu item name. Pressing the
shortcut key combination - all keys must be pressed together - will
select the menu item. On some systems keyboard menu navigation is also
provided: When the key for the underlined letter (case insensitive) of a
menu item name is pressed along with the Alt key the corresponding menu
item is selected.
Menu Bar
The menu bar contains buttons that let the user access specific windows
and functions of HiView. Depending on what operating system is being
used, the menu bar may be found at the top of the application window, or
it may be at the top of the display screen.
The appearance of the menu bar and the lists of menu items - like the
graphical user interface in general - will depend on the host operating
system, the window manager that is used by the host operating system, and
on the style design being used. Style options are provided when
running
HiView from the command line. Many window managers provide style
selection and customization tools. For the most part HiView attempts to
follow the user interface policies of the host system and its window
manager (important exceptions are noted where they occur).
Certain menu items may appear in different places than is shown here. For
example, Linux and Microsoft Windows place the Preferences menu item
under the File menu, while the Apple Mac system places it under the
HiView menu next to the "Apple" menu. The differences are noted in the
descriptions of the particular menu items.
In addition, menu shortcut key combinations will be different on
different systems. The most significant difference is that Mac systems
use the Command key where other systems use the Control key. In this
User's Guide the Mac Command key (abbreviated "Cmd") symbol (⌘)
will be used in shortcut key combinations; on other systems the Control
key (abbreviated "Ctrl") should be used for this symbol. On a Mac system
a special symbol is used to indicated the Shift key (⇧) and another
special special symbol is used to indicated the Option, or Alt, key
(⌥). If you can't see these special symbols in the User's Guide
then your browser does not have access to the font that includes them.
Pop-up menus are available to provided actions specific to various
contexts. Usually a pop-up menu is accessed by right-clicking (clicking
the right-most button of the cursor control device) in the context where
the menu is available. On Mac systems without three cursor control device
buttons, such as a single button mouse or a trackpad, pressing the
Control key while clicking should have the same effect as right-clicking.
All the examples in this User's Guide are from a Mac system.
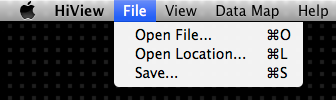
File
The File menu provides items to access image file
opening and saving controls.
Open File...
⌘O
The
Open Image File dialog is presented, which is used to browse the
local filesystems for a source image file to be opened.
Open Location...
⌘L
Opening a source location is done using the
Source Location bar, so
this menu item transfers
keyboard focus there and selects the current contents for editing.
Save...
⌘S
The
Save Image dialog is presented, which is used to select a file in
which to save the image region in the
Main Window Display Viewport.
Preferences...
⌘,
The
Preferences dialog is presented,
which is used to manage the various HiView configuration settings.
This menu item is located under the
HiView menu on
Mac systems.
Quit
⌘Q
Quits the application. The GUI layout geometry is saved so it can be
restored the next time HiView is run.
This menu item is located under the
HiView menu on
Mac systems.
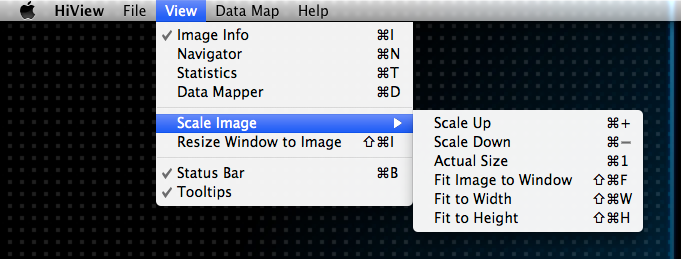
View
The View menu contains items to select which parts of HiView will be
shown as well as common image size controls.
Image Info
⌘I
The
Image Info panel is shown
when this menu item is checked; the panel is not visible when the item
is unchecked.
Navigator
⌘N
The
Navigator Tool is shown when this menu
item is checked; it is not visible when the item is not checked. When
the Navigator Tool is first shown after HiView is started it will appear in
the left
Tool Dock of the
Main Window.
Statistics
⌘T
The
Statistics Tool is shown when this menu
item is checked; it is not visible when the item is not checked. When
the Statistics Tool is first shown after HiView is started it will appear in
the bottom
Tool Dock of the
Main Window.
Data Mapper
⌘D
The
Data Mapper Tool is shown when this menu
item is checked; it is not visible when the item is not checked. When
the Data Mapper Tool is first shown after HiView is started it will appear in
the left
Tool Dock of the
Main Window, below the Navigator Tool if it is in the same dock area. However,
if the host system display screen is too small to allow room for both the
Navigator and Data Mapper tools in the same dock area, the right dock area
will be used for the Data Mapper.
Scale Image
The Scale Image submenu contains items for various common image scaling
actions.
Scale Up
⌘+
Scale Down
⌘-
The image scaling factor is increased or decreased by the
major scaling increment.
Actual Size
⌘1
The image scaling factor is set to 1.0; i.e. one source image pixel
exactly corresponds to one display image pixel.
Fit Image to Window
⇧⌘F
The image scaling factor is set to a value that will fit the
entire source image into the
Display Viewport. However, the scaling factor will not be allowed to
be outside the
scaling range.
Fit to Width
⇧⌘W
Fit to Height
⇧⌘H
Like the Fit Image to Window menu item, except that only the source image
width or height is fit into the Display Viewport.
Resize Window to Image
⇧⌘R
Resizes the
Main Window in an effort to
fit the entire source image into the Display Viewport at the current
scaling factor. There is a lower limit to how small the viewport is allowed
to become, and the window not allowed to be larger than the display screen.
Status Bar
⌘B
Toggles
whether or not the Status
Bar is displayed. The Status Bar displays information concerning the
current state of the application and is shown underneath the Main Image
Viewport. See
The Main
Window Status Bar.
Tooltips
Toggles whether or not to display tooltips when the cursor hovers over an
element of the GUI. Not all GUI elements have a tooltip. When tooltips are
enabled the cursor must dwell on an element for a short time (typically
about a second; the delay prevents tooltips from being distractedly
popping up while the cursor is in transit over the GUI). The tooltip will
appear next to the cursor position in a little, colored box containing
text that very briefly describes the element under the cursor. This can be
very helpful when first becoming familiar with the user interface elements,
or for a quick reminder of an elements purpose.
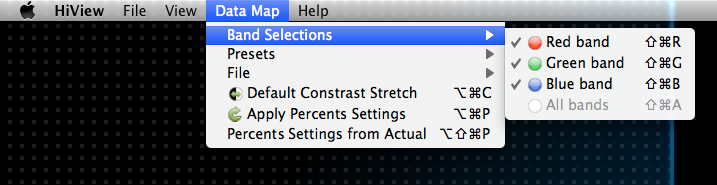
Data Map
The Data Map menu provides access to actions of the Data Mapper tool without needing to open and
use the tool directly.
Band Selections
Red Band
⇧⌘R
Green Band
⇧⌘G
Blue Band
⇧⌘B
All Bands
⇧⌘A
Checked menu items indicate display bands that are selected for
modification by any
Data Mapper tool
actions. The band selections also apply in the
Statistics Source Data tool when manipulating
data
Bounds on the Histogram. The
All Bands item is enabled if any band is not selected as a quick means of
selecting all bands.
Presets
The Presets submenu is identical to the
Presets pop-down menu accessible from the Mapping section of the
Data Mapper tool.
File
The File submenu is identical to the
File pop-down menu accessible from the Mapping section of the
Data Mapper tool.
Default Contrast Stretch
⌥⌘C
Selecting the Default Contrast Stretch menu item is the same as applying
the default contrast stretch
percents
in the Saturation Bounds section of the Data Mapper tool by clicking
the same icon there that is shown in the menu item.
Apply Percents Settings
⌥⌘P
Selecting the Apply Percents Settings menu item is the same as applying
the
percents settings
in the Saturation Bounds section of the Data Mapper tool by clicking
the same icon there that is shown in the menu item.
Percents Settings from Actual
⌥⇧⌘P
The Percents Settings from Actual action is the converse of the
Apply Percents Settings action: The Actual
Histogram Percents values are applied to the Settings values.
Help/HiView
The Help menu provides access to the HiView User's Guide plus
identifying information about the HiView application and the software
framework used in its implementation.
HiView Help
HiView Help is provided by the HiView User's Guide. Selecting this menu item
will launch the user's default web browser with the cover page of the Guide.
The contents of the Guide are to be found in the directory specified by the
Help Documentation
Location specified on the Preferences General pane.
If HiView can not find the User's Guide documentation files, or no
documentation location is specified in the Preferences, the HiView Help menu
item will be disabled.
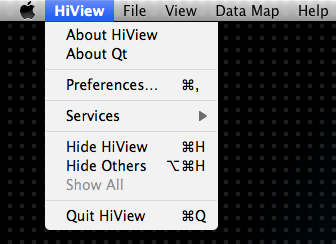
On Mac systems certain common menu items are placed in conventional
locations. Identifying information about the application that is
conventionally located under the Help menu on other systems is placed under
the application menu, which has the same name as the application in the
Menu Bar on Mac systems. Other menu items that the
Mac considers to be "standard" will be placed in their conventional
locations as noted.
About HiView
An information window is displayed that identifies the version of the
HiView software being used and lists credits and acknowledgements for the
individuals and organizations that made HiView possible.
This menu item is located under the Help menu on non-Mac systems.
About Qt
An information window is displayed that identifies the version of the
Qt software framework used in the HiView implementation along with a
brief description of what Qt is and its terms of use. HiView was built
with the software provided under the GNU Public License.
This menu item is located under the Help menu on non-Mac systems.
Preferences...
⌘,
The
Preferences dialog is presented,
which is used to manage the various HiView configuration settings.
This menu item is located under the
File menu on
non-Mac systems.
Quit HiView
⌘Q
Quits the application. The GUI layout geometry is saved so it can be
restored the next time HiView is run.
The Quit menu item is located under the
File menu on
non-Mac systems.
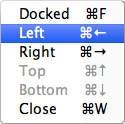
Dockable Tools
All dockable tools have a
pop-up menu with items that will relocate, or close, the tool dock.
Docked
Floating
⌘F
When a dockable tool is in a floating window separate from the
Main Window this item will be "Docked" to
move the tool into its last docked position within the Main Window;
otherwise this item will be "Floating" to move the tool out into a
floating window.
Left
⌘←
Right
⌘→
Top
⌘↑
Bottom
⌘↓
These menu items will move the tool into the corresponding location in
the Main Window. If the tool is in a floating window it will be docked.
For locations to which the tool can not be relocated the corresponding
item will be disabled.
Close
⌘W
The tool is closed (made invisible) whether it is docked or not. This
menu item acts the same as selecting the
View menu
item for the tool. When the tool is re-opened it will be in its previous
location.