HiRISE Operations Center
Department of Planetary Sciences
University of Arizona
Tucson, Arizona
HiView User's Guide
Reference
Preferences
The Preferences dialog provides several sections for managing the HiView
configuration settings. The settings are saved in a configuration file
that is updated when changed settings are Applied. The configuration
file also records values that are not Preferences settings - such
as the layout geometry of the application, and the directory pathname
for the last local file that was opened - that are written just before
the application quits.
The configuration file is named HiView.ini and is located in the
.config/UA_HiRISE directory under the user's home directory on Mac and
Linux systems; on MS/Windows systems the configuration file is located in
the user's "Application Data" directory under the "Documents and Settings"
directory. The contents of the file is plain text describing the HiView
application settings. The configuration file settings are read when
HiView starts up. If the file does not exist - for example, when HiView
is first run on a host system - the file is created and initialized with
the HiView Default settings. The file should not be changed outside of
HiView. If the file is removed for any reason HiView will recreate it as
if the application were being run for the first time on the host system.
If the HiView software is upgraded with a new installation the existing
configuration file will continue to be used.
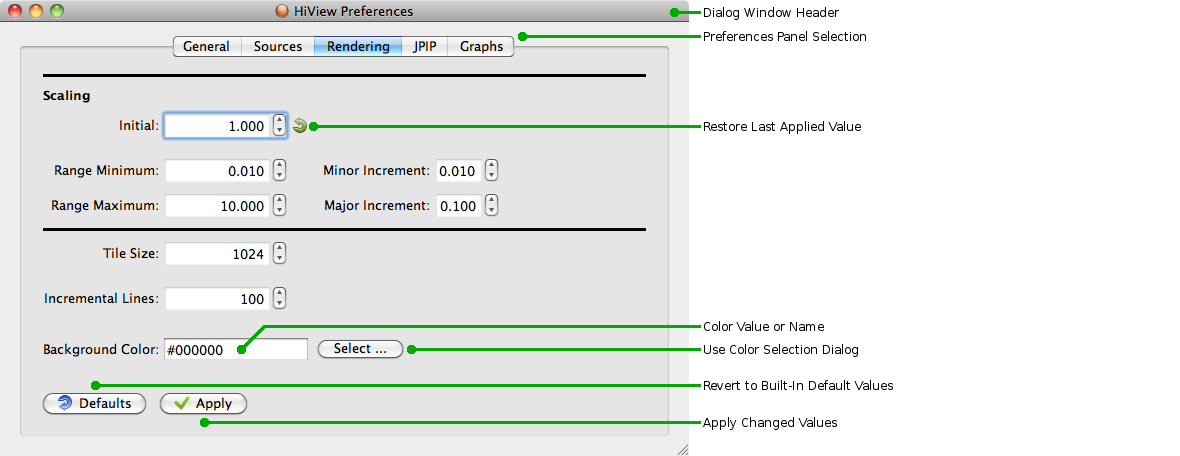
All Preferences sections have the same basic functionality. The
Rendering section, above is used as an example
to describe common controls.
Dialog Window Header
The Dialog Window Header is provided by the host system window manager,
so its style may be different than the example provided here for a Mac
system. The name of the dialog - "HiView Preferences" - will always be
included in the window header. Part of the Window Header style is the
appearance of window controls. One of the controls will close the dialog.
The dialog can also be closed with the ⌘W keyboard shortcut on Mac
systems; the key combination is Ctrl+W on other systems. If the dialog is
closed when there are any settings changes that have not been Applied a
dialog will be presented asking if the unsaved changes should be applied
or discarded, or if the window close should be canceled so the
Preferences can be examined again.
Section Selection Tabs
At the top of the dialog window, immediately below the Window Header, is
a row of tab buttons used to select a Preferences section. When a tab
button is clicked, the panel for the section named on the tab will be
brought to the front. Each section panel has its own
particular settings controls.
Restore Value

The Restore Value button is a circular green arrow icon button that
appears to the right of a value field whenever it contains changes that
have not been Applied. If the button is clicked the field will be
restored to its value from the last time it was Applied.
Apply

At the bottom of each section pane is an Apply button. The Apply button
will only be enabled when there are changed settings in the section
that have not been saved.
Clicking the Apply button will save all changes made to section settings
in the configuration file and apply them to the application operation.
All Restore Value icon buttons on the section panel will disappear and
the Apply button will become disabled again.
Note that the Apply button only affects settings for the visible section.
Each section panel has its own Apply button.
Defaults

At the bottom of each section pane is a Defaults button. The Defaults
button will only be enabled when there are settings in the section that
do not have the HiView default value. Clicking the Defaults button will
revert all section settings to have their default values. Changed
settings are not automatically saved; any settings that are changed will
have a Restore Value icon button appear next to them.
Note that the Defaults button only affects settings for the visible section.
Each section panel has its own Defaults button.
Color Value
Some settings specify a Color Value which may take the form of an RGB
triplet beginning with the crosshatch ('#') character, or a color
name.
An RGB triplet is three hexadecimal values specifying the Red, Green, and
Blue color component values preceded by a crosshatch ('#') character.
Each component value must be in the range 0 (no intensity) to ff (255
decimal which is full intensity) and each value must have the same number
of digits (so values with one digit must be padded with a leading 0 if
there is any value with two digits).
A color name may be the name of a primitive color - "red", "green", "blue" -
or the name of any primitive color combination - "cyan" is green and blue,
"magenta" is red and blue, "yellow" is red and green, "white" is all three -
in which each component will be at full intensity. "black" is all components
at zero intensity. All
World Wide Web color names are recognized. On host systems using a
window manager based on the X11 windowing system all
X11 color names are recognized.
Instead of specifying the Color Value directly a Color Selection Dialog
may be used to interactively choose the value. Click the Select... button
to bring up the dialog. The Color Selection Dialog provided by the host
system will be used; the Graphs section shows an
example for a Mac system. After a value has been selected from the
dialog the Color Value field will be filled in with the corresponding
specification.
General
The General Preferences control settings that apply to HiView as a whole.
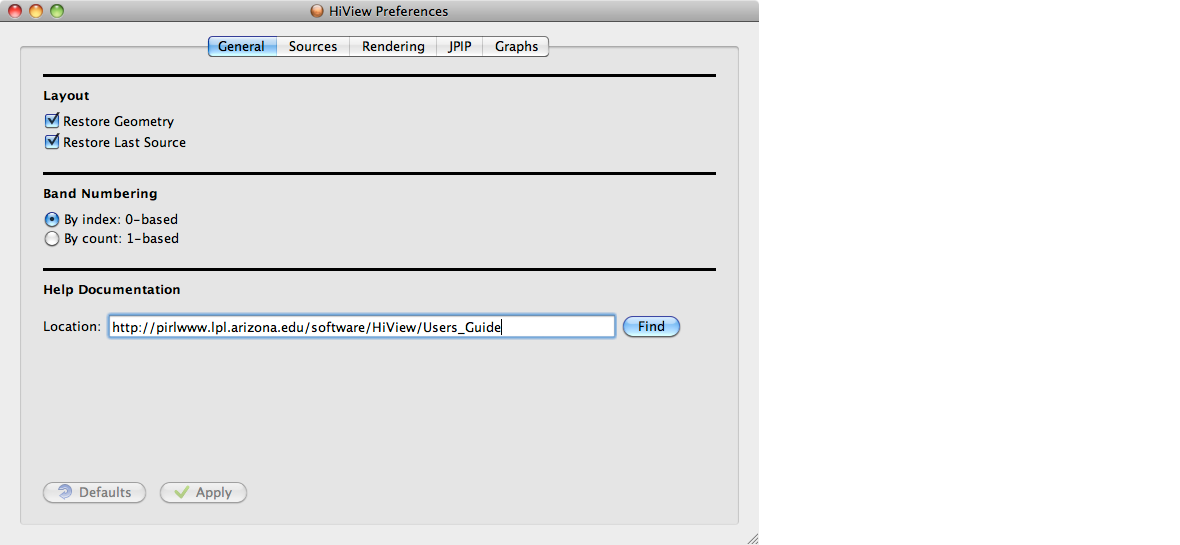
Layout
Restore Geometry
When HiView starts up it can restore the geometry of its layout from the
last time it was used.
Restore Last Source
When HiView starts up it can attempt restore the image source that
was last opened.
Band Numbering
Source data bands may be numbered by index - in which the lowest
numbered band is 0 - or by count - in which the lowest numbered band is
1. This setting will affect all band numbering in all tools.
By index
0-based
Index, or
ordinal, numbering is used with ordered sets; the first element of
the set has the number 0. All source data bands are ordered according to
their logical occurrence in the source file, which may reflect a physical
characteristic such as the position of the band data on a wavelength
spectrum. Therefore HiView uses indexed band numbering by default.
By count
1-based
Count numbering does not necessarily imply any inherent order in the
elements being counted; the first element that happens to be selected
from a group of elements is number 1. Nevertheless, count numbering is
more familiar than index numbering. HiView will still maintain the
inherent ordering of the source data bands when applying count numbering.
Help Documentation
The HiView User's Guide documentation will be presented in a web browser
when HiView Help is selected in the Help menu.
Location
The location of the HiView User's Guide documentation may be
a directory on the host's local filesystem or a URL for a directory on
a remote HTTP server. If the directory entered does not contain the
HiView_Users_Guide.html file an notice dialog will be displayed offering
to use the location anyway (if the documentation is only temporarily
unavailable) or to revert to the previous location value.
Find
When the Find button is pressed HiView will try a built-in list of likely
locations for the User's Guide; the list of locations is provided in
the tooltip for the button. The first location where the documentation files
are found is entered into the Location field.
Sources
The Sources section provides tools for managing the
Source List contents. This
includes allowing the user to change and remove Source Locations,
reorder the contents of the list, as well
change the maximum number of Source Locations that will be held in
the list.
Entries
Capacity
The Entries label displays the current number of Source Locations
in the Source List. The Capacity setting controls the maximum
number of entries that will be retained in the list.
Source List
The Source List
contains Entries for the most recently
opened
Source Locations. The contents of the list may be modified as desired.
Selecting
A Source Location entry may be selected by clicking on it. To select
multiple adjacent entries, click on the first, hold down the Shift key,
and click on the last. All entries between and including the two ends
will be selected. To select multiple entries that are not adjacent press
the Command (⌘) key on a Mac system, or the Ctrl key on other
systems, while clicking on the entries to be selected.
Moving
To change the order of entries in the List, click and drag one or more
entries to a new location.
Editing
Editing a Source Location entry can be initiated by selecting the entry
and clicking the Edit
button or by double-clicking the entry. At this point the Source Location
may be edited by typing new location text and by using the text editing
conventions of the host system. A
pop-up menu for the field provides items and keyboard shortcuts for the
various editing operations. Editing includes the ability to cut, copy, and
paste to and from the entry. To enter the edited entry into the list
press the Enter, or Return, key or click some other entry in the Source
List. To cancel changes and restore the previous Source Location press
the Escape key.
Removing
Clicking the Remove button will remove all selected entries from the
list.
Restoring
Whenever a change has been made to the contents of the Source List a
Restore icon button will appear in the
lower-right corner of the Source List pane. Clicking this button will
restore the list to have the entries it contained before any changes were
made.
Rendering
The Rendering section provides settings that control how HiView renders
images for display.
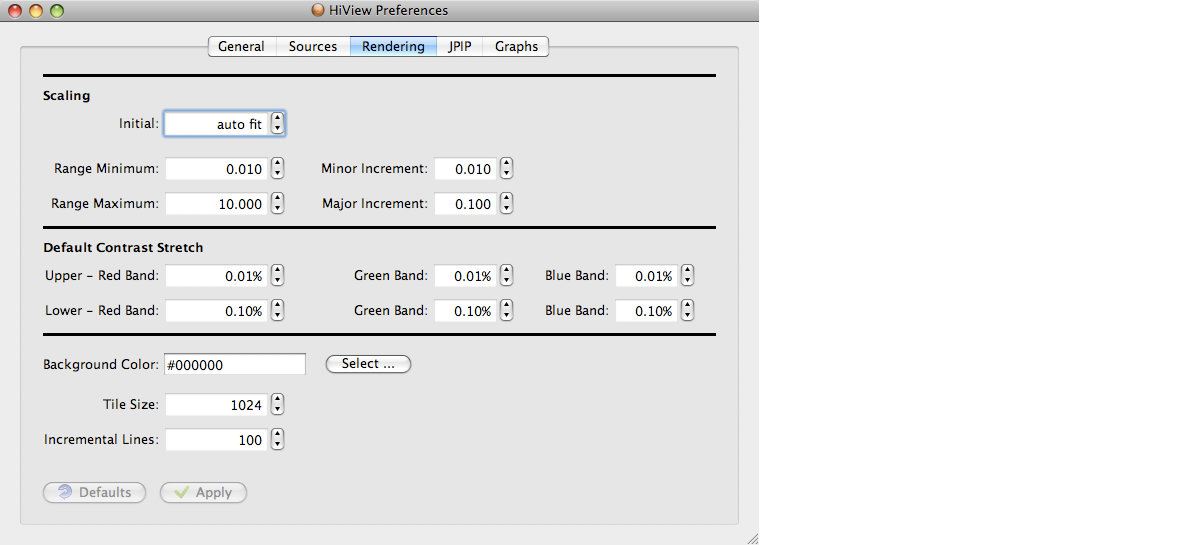
Scaling
Scaling settings influence the
possible image display scale factor values.
Initial
The initial scaling factor is used when an image is opened. For example,
it might be convenient to have each opened image intially scaled to full
(1.0) resolution. The scaling factor must be within the scaling range. As
a special case, if the setting entered is zero - then the field will say
"auto fit" - the initial scaling factor will be determined such that the
entire image will fit within the
Main Window Display Viewport.
However, if the resulting scale factor is outside the scaling range the
nearest range limit is used; e.g. if the image is very large it may not
fit within a small Display Viewport area even at the minimum scaling
factor.
Range Minimum
Range Maximum
Other than being a positive, non-zero value, there are no inherent limits
to a scaling factor. However, limits need to be set to determine the
range of scaling controls, which prevent using unreasonable scale factors
that could produce unreasonable results. The default scaling factor
limits have been chosen to limit descreasing the image display resolution
to 0.01 - one one-hundredth the size of the full resolution image - and
limit increasing the resolution to 10.0 - ten times full resolution.
HiView enforces absolute limits of 0.001 and 100.0 for the scaling range.
Minor Increment
Major Increment
Scaling conrols are provide to change the current scaling factor by
a minor or major increment amount. For example, when the Scale Up item
of the
View Scale Image menu, or image
display pop-up menu, is selected - or its shortcut key combination is
used - the current scaling factor will be increased by the Major Increment.
The default scaling increments - 0.01 and 0.1 - have been chosen to be
appropriate under most circumstances. HiView enforces an absolute maximium
of 1.0 for the scaling increments.
Default Contrast Stretch
The Default Contrast Stretch applies
Data Mapper Saturation Bounds
using the Statistics Histogram
percents specified by the settings here.
Background Color
When an image region does not entirely fill the
Display Viewport the
viewport background is painted with the Background
Color Value. The default black background was
chosen because it is consistent with the color typically used for invalid
image data pixels; i.e. source image data that is below the valid data
Limit is typically a non-observation
zero value from geometric image processing that leaves empty background
areas in the resulting image, and these zero pixel values are usually
mapped to zero display values that appear
black on the screen. However, any other display color can be chosen if,
for example, a clearer distinction between the image region and the
Display Viewport background is desired.
Tile Size
HiView uses Display Tiles
for managing the display of large JP2 files in the Display Viewport to
help optimize image rendering time and user interface responsiveness. A
display tile is a square area of the display; the Tile Size is the
length of a side of the tile in display pixel units.
The
bigger the tile size, the fewer tiles have to be rendered, but the longer
it takes to render each tile. Conversely, the smaller the tile size, the
shorter the rendering time per tile, but the more tiles have to be
rendered. The default Tile Size seems to strike a good balance for most
systems.
Incremental Lines
When source data is being rendered and mapped to display data this is
done in incremental chunks. The size of a chunck is the Tile Size width
and the Incremental Lines height specified in display pixel units. When a
chunk has been rendered and mapped it is painted in the Display Viewport.
At this time, if the current display rendering has been canceled -
either because the Activity
Indicator has been clicked, or because display scrolling or scaling,
or modified data mapping, has changed the image rendering requirements -
the current rendering operation will not continue; instead any new
rendering operation will begin. Interrupting a rendering operation can
only be done when an incremental chunk has been completed. Thus the number
of Incremental Lines, which is a hint to the rendering mechanism, affects
user interface responsiveness. The default number of Incremental lines
seems to achieve good user interface responsiveness for most systems
without generating excessive overhead costs.
JPIP
The JPIP section provides settings that control the interaction with a
remote JPIP server.
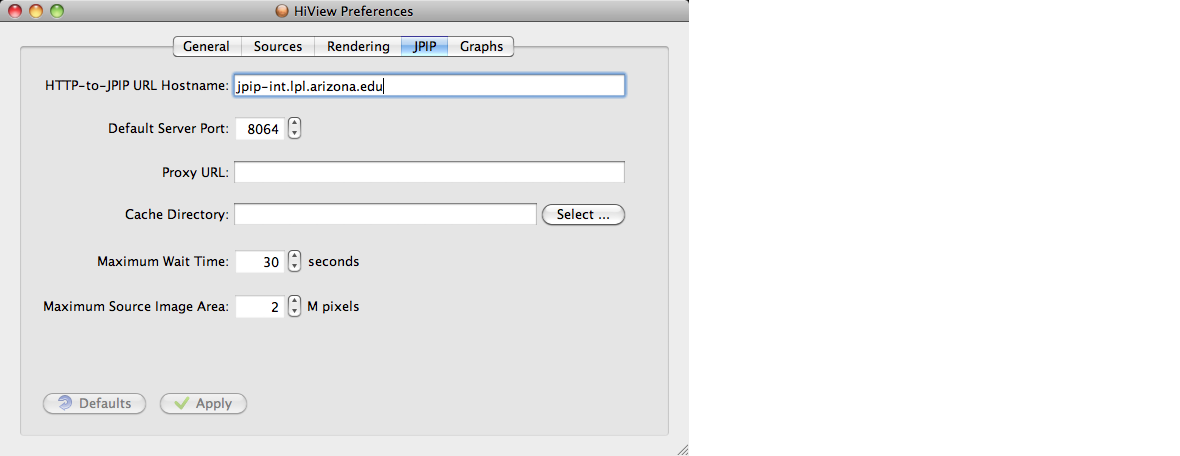
HTTP-to-JPIP URL Hostname
When
opening
a Source Location specified as a URL, if it is an HTTP URL that
contains a reference to a JP2 file HiView converts the HTTP URL to a JPIP
URL request for the JP2 file. A key part of this conversion is replacing
the hostname for the HTTP server with the hostname for the JPIP server.
The HTTP-to-JPIP URL Hostname specifies the hostname that is to be used.
The hostname may also be specified as an Internet Protocol (IP) address.
If the HTTP-to-JPIP URL Hostname field is left empty then the hostname
from the HTTP URL will be used.
The default hostname is the JPIP server at the HiRISE Operations Center
that is suitable for use when dragging links for JP2 observation data
products onto HiView from the HiRISE web site. However, any valid hostname for a
JPIP server may be specified.
When a new hostname is entered the name, if not empty, is checked by
doing an internet Domain Name Service (DNS) lookup on it. If this fails
a dialog appears asking if the new name should be used anyway; if not
the previous name will be restored. This check is also done each time
HiView starts up.
Accessing some server systems - such as the internal JPIP server at the
HiRISE Operations Center - require an authenticated Virtual Private
Network (VPN) connection for security reasons. A system administrator for
the protected server needs to be contacted to obtain the required VPN
authentication information. If HiView is started when the VPN connection
has not been established the DNS check on the protected server hostname
can be expected to fail. In this case saying, "Yes, Use the hostname
anyway" in the warning dialog is appropriate. A connection to a protected
JPIP server host will still fail until the VPN connection has been
established, but HiView does not need to be quit to do this.
Default Server Port
Along with the HTTP-to-JPIP URL Hostname, the Default Server Port is
used in the conversion of an HTTP URL to a JPIP URL for a JP2 file.
The appropriate port number, like the appropriate hostname, should be
obtained from the system administrator for the site to be accessed.
The HiView default value is suitable for use with the HiView default
HTTP-to-JPIP URL Hostname. If the port number is set to zero the port
number from the HTTP URL will be used.
Proxy URL
If the JPIP server to be accessed requires the use of a proxy server
system, provide the URL of the proxy system here. Information about
a required proxy server should be obtained from the system administrator
for the site to be accessed. If this field is empty no proxy system will
be used. Normally none is required.
Cache Directory
This is an experimental feature that is not currently in use.
Maximum Wait Time
The maximum time that HiView should wait, in seconds, while
trying to connect to a JPIP server before giving up. The
Maximum Wait Time applies to both JPIP and HTTP servers.
Maximum Source Image Area
When
opening
a JP2 Source Location a low resolution version of the entire image is
pre-rendered for use in filling in the Display Viewport until the
requested source image data has been rendered. The amount of memory used
for this background image is limited by the Maximum Source Image Area,
measured in Megapixels (one Megapixel is 1048576 pixels). The source
image will be rendered into the memory area provided using a scaling
factor that will enable the entire image to fit. If the background image
area is too large it can take too long to render the image; if it is too
small the resolution of the image will be very coarse. The default value
seems to provide a background image that usually renders in a reasonable
amount of time and provides a background fill that looks satisfactory for
most images.
Graphs
The Graphs section provides settings to control the appearance and functioning
of graphs used by the Statistics and
Data Mapper tools.
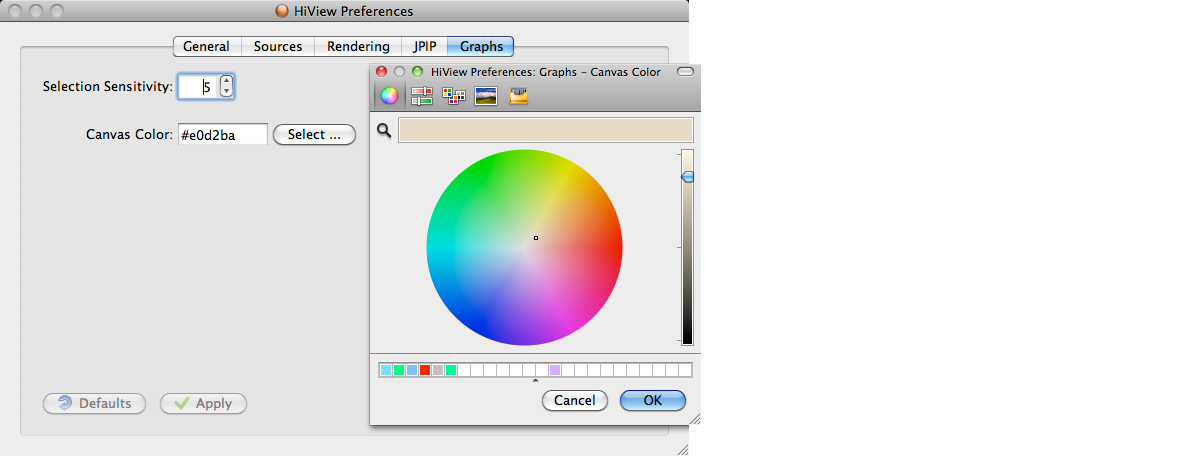
Selection Sensitivity
When an element in the graph can be selected for interactive manipulation
- such as the Data Mapper Functions
- the Selection Sensitivity is used when determining if an element is close
enough to the cursor position to be selected. The sensitivity value
roughly corresponds to distance in screen pixel units. Larger values result
in "sloppy" selection; smaller values provide a more "precise" selection.
Canvas Color
The Canvas
Color Value specifies the background
color of the graph plotting area.