TOC
|
Home TOC |
|
A Simple Example: HelloWorld
This example shows you how to create a service named
HelloWorld. A remote client of theHelloWorldservice can invoke thesayHellomethod, which accepts a string parameter and then returns a string.HelloWorld at Runtime
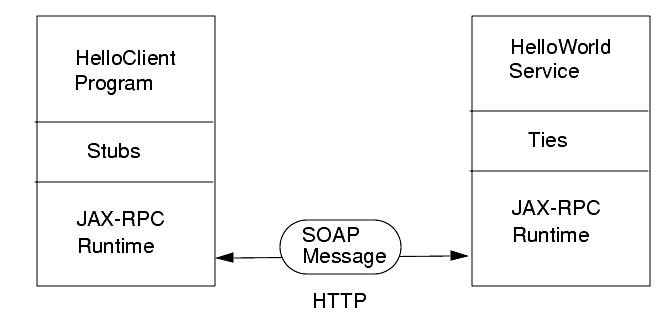
Figure 1 shows the structure of the
HelloWorldservice after it's been deployed. Here's what happens at runtime:
- To call a remote procedure, the
HelloClientprogram invokes a method on a stub, a local object that represents the remote service.- The stub invokes routines in the JAX-RPC runtime system of the reference implementation.
- The runtime system converts the remote method call into a SOAP message and then transmits the message as an HTTP request.
- When the server receives the HTTP request, the JAX-RPC runtime system extracts the SOAP message from the request and translates it into a method call.
- The JAX-RPC runtime system invokes the method on the tie object.
- The tie object invokes the method on the implementation of the
HelloWorldservice.Figure 1 The
HelloWorldExample at RuntimeThe application developer only provides the top layers in the stacks depicted by Figure 1. Table 1 shows where the layers originate.
HelloWorld Files
To create service, an application developer needs to provide just a few files. For the
HelloWorldexample, these files are in thedocs/tutorial/examples/jaxrpc/hellosubdirectory:
HelloIF.java- the service definition interfaceHelloImpl.java- the implementation class for theHelloIFinterfaceconfig.xml- a configuration file read by thexrpcctool, which creates the stub and tie classesweb.xml- a deployment descriptor for the Web component (a servlet) that dispatches to the serviceHelloClient.java- the remote client that contacts the service and then invokes thesayHellomethodOverview of Steps
The basic steps for developing a service definition are as follows:
- Code the service definition interface and implementation class.
- Compile the service definition code of step 1.
- Create the configuration file.
- Generate the stubs and ties.
- Create the deployment descriptor.
- Package the service definition.
- Deploy the service definition.
On the client side, these are the steps:
Setting Up
Before you try out the
HelloWorldexample, verify that you've installed the required software and that you've set the necessary environment variables.Required Software
For a list of the required software and supported operating systems, see the Release Notes of the Java Web Services Developer Pack.
The Java Web Services Developer Pack includes Tomcat and the
antbuild utility. You must use the included version of Tomcat to run the examples in this tutorial. Although you may use a separate installation ofant, we recommend that you run the included version in order to avoid confusion over incompatible versions.Environment Variables
Before you try out the
HelloWorldexample, you must set some environment variables. For more information, see the Release Notes of the Java Web Services Developer Pack.Setting build.xml Properties
If you are on a Windows system, you may skip this section.
- In a text editor, open the
docs/tutorial/examples/jaxrpc/common/config-build.propertiesfile.- If you are on a UNIX system, change the value of the
script-suffixproperty tosh. For Windows, the value should bebat, which is the default.- Save the
config-build.propertiesfile and exit the editor.Coding the Service Definition Interface and Implementation Class
A service definition interface declares the methods that a remote client may invoke on the service. The interface must conform to a few rules:
- It extends the
java.rmi.Remoteinterface.- It must not have constant declarations, such as
public final static.- The methods must throw the
java.rmi.RemoteExceptionor one of its subclasses. (The methods may also throw service-specific exceptions.)- Method parameters and return types must be supported JAX-RPC types. (See section 5.1 of the JAX-RPC Specifications.)
In this example, the service definition interface is
HelloIF.java:package hello; import java.rmi.Remote; import java.rmi.RemoteException; public interface HelloIF extends Remote { public String sayHello(String s) throws RemoteException; }In addition to the interface, you'll need to code the class that implements the interface. In this example, the implementation class is called
HelloImpl:package hello; public class HelloImpl implements HelloIF { public String message = new String("Hello "); public String sayHello(String s) { return new String(message + s); } }Compiling the Service Definition Code
To compile
HelloIF.javaandHelloImpl.java, go to thedocs/tutorial/examples/jaxrpc/hellodirectory and type the following:ant compile-serverThis command places the resulting class files in the
buildsubdirectory.Creating the Configuration File
The
config.xmlfile contains information needed by thexrpcctool, which you'll run in the next section.In the file listing that follows, note the values defined in the
<service>element. The name of the service,HelloWorld, will be used as the prefix of theHelloWorldImplclass name. Generated by thexrpcctool, theHelloWorldImplis instantiated by the client class. (See Coding the Client.) ThepackageNameattribute,hello, is the name of the package of the classes generated byxrpcc. In the<interface>subelement, thenameattribute corresponds to the fully qualified name of the service definition interface,hello.HelloIF. TheservantNameattribute is the name of the interface's implementation class,hello.HelloImpl.<?xml version="1.0" encoding="UTF-8"?> <configuration xmlns="http://java.sun.com/jax-rpc-ri/xrpcc-config"> <rmi name="HelloWorldService" targetNamespace="http://hello.org/wsdl" typeNamespace="http://hello.org/types"> <service name="HelloWorld" packageName="hello"> <interface name="hello.HelloIF" servantName="hello.HelloImpl"/> </service> </rmi> </configuration>For more information about the syntax of the tool's configuration file, see the section Configuration File (page 521).
Note: Although required for the reference implementation of JAX-RPC, the configuration file andxrpcctool are not defined in the specifications. Their syntax and usage may change in future releases.
Generating the Stubs and Ties
The
xrpcctool generates the stubs and ties, which are lower-level classes that enable the client and server to communicate. The tool also creates a properties file and a WSDL file. Used internally by the reference implementation, the properties file is not defined in the specifications. For information about the relationship between JAX-RPC technology and WSDL files, please refer to the JAX-RPC specifications.In this example, the tool reads the service definition interface and the configuration file. (Alternatively, the tool may read a WSDL file instead of the interface. See Starting With a WSDL Document (page 523) for more information.)
The
xrpcctool is a script--xrpcc.shfor UNIX orxprcc.batfor Windows. To create the stubs and ties, run the tool as follows:xrpcc.sh -classpath build -both -d build config.xmlxrpcc.bat -classpath build -both -d build config.xmlThe
-bothoption instructsxrpccto generate both stubs and ties. The-doption denotes the destination directory for the generated files. See the section Syntax (page 519) for the full syntax of thexrpcctool.Creating the Deployment Descriptor
A deployment descriptor is an XML file that provides configuration information for the Web server about the Web components (JSP pages or servlets) that are in a Web application. Because the
HelloWorldservice is deployed as a servlet, the deployment descriptor has some elements that are related to the service. This section describes only those elements; for more information about deployment descriptors, see the Java Servlet Specifications.Let's take a quick look at a couple of the elements in the deployment descriptor (
web.xml). First, note theHelloWorld_Config.propertiesvalue of the<init-param>element. This properties file was generated by thexrpcctool. The name of the file is theHelloWorldservice name (which was defined in the configuration file) appended by the_Config.propertiesstring. The value of the<url-pattern>element,/jaxrpc/*, is part of the URL that designates the service's endpoint. This URL is passed to theHelloClientprogram as a command-line parameter. See Running the Client.The
web.xmldeployment descriptor follows:<?xml version="1.0" encoding="UTF-8"?> <!DOCTYPE web-app PUBLIC "-//Sun Microsystems, Inc.//DTD Web Application 2.3//EN" "http://java.sun.com/j2ee/dtds/web-app_2_3.dtd"> <web-app> <display-name>HelloWorldApplication</display-name> <description>Hello World Application</description> <servlet> <servlet-name>JAXRPCEndpoint</servlet-name> <display-name>JAXRPCEndpoint</display-name> <description> Endpoint for Hello World Application </description> <servlet-class> com.sun.xml.rpc.server.http.JAXRPCServlet </servlet-class> <init-param> <param-name>configuration.file</param-name> <param-value> /WEB_INF/HelloWorld_Config.properties </param-value> </init-param> <load-on-startup>0</load-on-startup> </servlet> <servlet-mapping> <servlet-name>JAXRPCEndpoint</servlet-name> <url-pattern>/jaxrpc/*</url-pattern> </servlet-mapping> <session-config> <session-timeout>60</session-timeout> </session-config> </web-app>Packaging the Service Definition
A service definition is packaged in a Web application archive (WAR), a JAR file whose contents is defined by the Java Servlet specifications. WAR files make it easy to distribute and install (deploy) the service on various sites. In a later step, you will deploy the
jaxrpc-hello.warfile on Tomcat. For JAX-RPC, a WAR file contains the following files:
- One or more service definition interfaces
- Each service definition has a single interface, but a WAR file may contain the files for more than one service. In this example, the service definition interface is
HelloIF.class.- One or more service definition classes that implement the interfaces
- For each service definition interface, you must provide a corresponding service implementation class (
HelloImpl.class).- Classes for pluggable serializers and deserializers
- This example does not require these files. (See the JAX-RPC Specifications for more information.)
- Other files required by the service implementation classes
- Examples of these files are: helper classes, JPEG images, and XML documents. Since it's so simple, the
HelloImplclass does not need any of these other files.- A deployment descriptor
- All WAR files require a deployment descriptor (
web.xml).- An optional WSDL file that describes the service
- In a previous section, you created the
HelloWorldService.wsdlfile by running thexrpcctool.In addition to the preceding list of files, in the JAX-RPC reference implementation a WAR file also contains several files generated by the
xrpcctool: tie, servlet, and helper classes; and a server configuration file (HelloWorld_Config.properties).To package the
HelloWorldservice definition, type the following:ant packageThis command creates the
jaxrpc-hello.warfile.Deploying the Service Definition
To deploy the service definition, you simply copy the WAR file to Tomcat's
webappsdirectory:ant deployThe first time you deploy a WAR file, Tomcat must be started. For subsequent deployments of the same WAR file, you do not need to start or restart Tomcat. Because you are about to deploy the
jaxrpc-hello.warfile for the first time, if Tomcat is running now, you must shut it down and then restart it.To shut down (stop) Tomcat, type the following command in a terminal window:
shutdown.shshutdownTo start Tomcat, type this command:
startup.shstartupTo verify that the
HelloWorldservice has been deployed, open a browser window and specify this URL:http://localhost:8080/jaxrpc-hello/jaxrpcThe browser should display these lines:
A Web Service is installed at this URL.

It supports the following ports: "HelloIF"
(http://localhost:8080/jaxrpc-hello/jaxrpc/HelloIF)
Coding the Client
The
HelloClientis a stand-alone program that calls thesayHellomethod of theHelloWorldservice. It makes this call through a stub, a local object which acts as a proxy for the remote service.In the code listing that follows, note the names of the
HelloIF_StubandHelloWorldImplclasses, which were generated by thexrpcctool. TheHelloIFprefix matches the name of the service definition interface and theHelloWorldprefix corresponds to the service name specified in the configuration file. TheHelloWorldImplclass is the implementation of a service as described in section 9.3 of the JAX-RPC specifications. The client gets a reference to the stub by calling thegetHelloIFmethod ofHelloWorldImpl.The parameter of the
_setTargetEndpointmethod is a URI that denotes the address of the target service port. For details on this URI, see Running the Client.The source code for the
HelloClientfollows:package hello; public class HelloClient { public static void main(String[] args) { try { HelloIF_Stub stub = (HelloIF_Stub)(new HelloWorldImpl().getHelloIF()); stub._setTargetEndpoint(args[0]); System.out.println(stub.sayHello("Duke!")); } catch (Exception ex) { ex.printStackTrace(); } } }Compiling the Client Code
Because the client code refers to classes generated by the
xrpcctool, be sure to run the tool before compiling the client. To compile the client, type the following:ant compile-clientRunning the Client
To run the
HelloClientprogram, type the following:ant runThe program should display this line:
Hello Duke!The
runtarget executes this command:java -classpath <cpath>hello.HelloClient <endpoint>We created the
run-hellotarget because the classpath includes many JAR files. (The classpath will be simplified in a later release.) The command-line parameter for theHelloClientprogram is the service endpoint:http://localhost:8080/jaxrpc-hello/jaxrpc/HelloIFThe
jaxrpc-helloportion of the URL is the context of the servlet that implements theHelloWorldservice. This portion corresponds to the prefix of thejaxrpc-hello.warfile. Thejaxrpcstring matches the value of the<url-pattern>element of theweb.xmldeployment descriptor. And finally,HelloIFis the name of the interface that defines the service.
|
Home TOC |
|