An image is displayed in HiView by opening the source file that contains the image data. There are several ways that HiView may be told where the source file is located and how to obtain the image data.
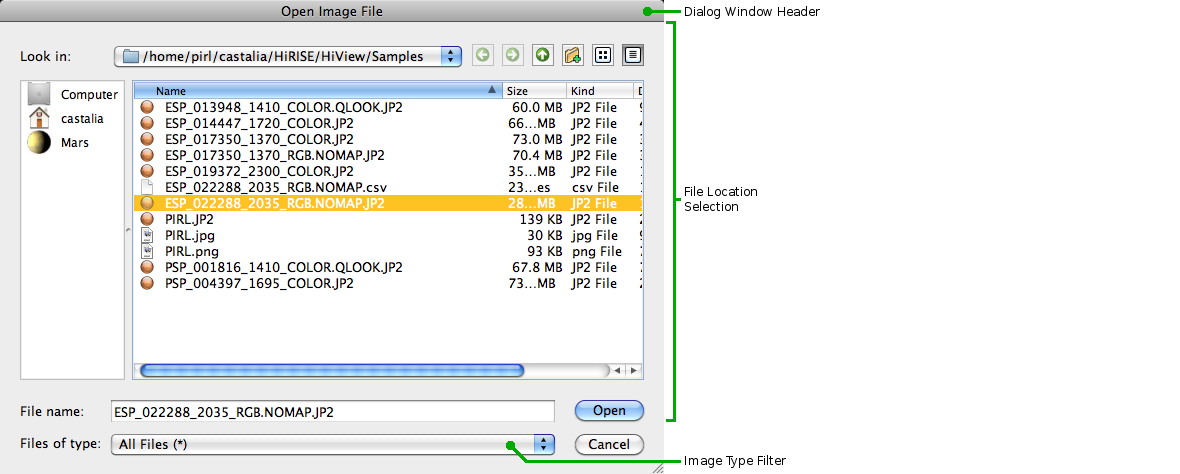
If HiView is to obtain image data from a local file the location of the file can be found using the Open Image File dialog. The dialog is accessible from the Open File... item of the File menu. The file selection dialog identifies itself in its Dialog Window Header as an "Open Image File" browser.
The File Location Selection controls enable browsing through the local filesystem to find and select a file to be opened.
The central file list shows all the files in the current directory. Clicking on a directory in the central file list makes it the current directory. Clicking on a file selects it to be opened by HiView.
Above the central file list is the current directory (or "folder") pathname. When the current directory pathname is clicked a drop-down list appears with all the parent directories of the current directory and, at the bottom of the list, several "Recent Places" that have been visited.
The directory navigation arrows next to the current directory pathname take the browser back to the last directory visited, forward to the previous directory after having gone back, and up to the parent of the current directory. Next to the directory navigation arrows is a button which, when clicked, will create a directory named "New Folder" in the current directory (this button is disabled if the user does not have the necessary permissions to create a directory in the current directory) and select the "New Folder" name for editing to the desired name. The central file list pop-up menu also contains a New Folder item as well as Rename, Delete and a Show Hidden Files checkable item. The two buttons in the upper right corner control how files will appear in the central file list.
The "Look in" panel on the left side contains links for the root of the host computer filesystem, the user's home directory, and any other often used locations. A directory from the central file listing may be dragged into this panel and it will be remembered. On Mac systems, Finder and desktop folder (and file storage device) icons may be dragged into the panel. A "Look in" item may be removed by selecting it and using the Remove item in the panel's pop-up menu.
The File name field will initially contain the name of the last file selected in the Open Image File dialog, if any. Typing in the File name field will produce a drop-down selection list of filenames that match the characters entered so far. If a directory name is entered (Enter or Return key is pressed, or the Open button is clicked) it will become the current directory. Entering a filename selects it to be opened by HiView.
The drop-down list of image file types indicates what types of image files HiView can read. Selecting an item from this list will filter out all files except the selected type, and directories, from the File Location Selection list.
The Source Location field at the top of the Main Window may be used to enter the location of a source file to be opened. A location is entered into the Source Location field by typing its name followed by the Enter or Return key. Previously opened source locations may be selected from the pop-down list that opens when the down arrow at the right end of the Source Location field is clicked.
The Source Location field may be edited. This includes pasting text that has been copied into the Window Manager clipboard from some other application as well as the usual text editing capabilities expected on the host system. Having edited the Source Location field press the Enter or Return key to submit the modified location to be opened.
A source location may be a local filesystem pathname or a URL.
Local filesystem pathnames must be fully qualified with the directory path that leads to the named file. As a shortcut, if the directory path starts with the tilde ('~') character the tilde is replaced with the user's home directory path. A directory path contains one or more directory names separated by the host system's directory path delimiter character. This is the forward slash ('/') on all systems except MS/Windows which uses the back slash ('\'). For consistency, the forward slash delimiter may also be used in HiView on MS/Windows systems.
A URL (Uniform Resource Locator) is used to specify the location of a remote source file. A simple URL has the form:
protocol://hostname[:port]/pathname
The first part of a URL, before the "://" characters, specifies the
access protocol (or scheme) used to communicate with
the server that is expected to deliver the file content. This may be
"http" (protocol names are case insensitive) for the Hypertext Transfer
Protocol used by standard internet web servers, or "jpip" for the JPEG2000 Interactive
Protocol used by specialized servers of JP2 files. The "file"
protocol is also recognized; it specifies the location of a file obtained
from the local host filesystem. The second part of a URL specifies the
hostname (or
IP address)
of the host system where the server connection is to be made (a "file"
URL has no host name), and an optional system port number separated from
the hostname by a colon (':') character. The final part is the full
pathname to the source file as it is known to the
server that will deliver its contents.
When HiView is given a URL it is first examined to decide how it should be handled. A URL that specifies the "file" protocol is simply converted to a filesystem pathname. An HTTP URL, that specifies the "http" protocol and does not contain a reference to a JP2 file, is submitted as a network request for a conventional image file. When the file data has been delivered it is treated the same as data obtained from a local file.
A URL that refers to a JP2 file is given special handling: Remote access to a JP2 file will use the "jpip" protocol to establish a persistent connection to a JPIP server that will interact with HiView, providing requested parts of the JP2 file contents as needed. This is particularly important for JP2 files that contain very large images for which HiView will only request that part of the image data required for display rendering. Obtaining network delivery of the entire content of a very large file could take a very long time, and the amount of data could be more than the host system can hold. HiView solves this problem by acting as an intelligent client with the JPIP server to manage image data requirements efficiently according to the image rendering requirements of the user.
A URL that refers to a JP2 file may specify the "jpip" protocol in the URL syntax. An HTTP URL is examined to see if its pathname refers to a JP2 file; i.e. if the pathname ends with the ".JP2" (case insensitive) extension. In addition, if the pathname does not refer to a JP2 file the URL is examined for a query. A URL query - which contains information used by web services for special processing - is text, separated from the pathname by a question mark ('?') character, that has the form:
key=value[&key=value[...]]
If any query value refers to a JP2 file the value is taken to be the
requested source file pathname. An HTTP URL that contains a reference to
a JP2 file is converted to a JPIP URL that specifies the "jpip" protocol.
The conversion is done using the settings from the Preferences JPIP section: The
HTTP-to-JPIP Hostname (if not empty) replaces the hostname in the HTTP
URL; the Default Server Port number (if a positive value) is applied; and
the pathname referring to a JP2 file becomes the JPIP URL pathname. HiView
is distributed with a default HTTP-to-JPIP Hostname that specifies a JPIP
server at the HiRISE Operations Center, but any standards compliant
JPIP server hostname may be used.
Drag-and-Drop may be used with most web browsers. A web browser offers a convenient way to look for remote files of potential interest. When a file is found that is to be examined closely its link can be dragged from the web page and dropped onto HiView which will attempt to open the remote file. Web page links usually contain a URL that, when dragged and dropped onto HiView, is opened like any other Source Location. For example, the HiRISE web site offers an extensive catalog of observation images returned from the Mars Reconnaissance Orbiter spacecraft. This catalog can be browsed, the web page for a specific product selected, and a link under Image Products dragged onto HiView for detailed exploration.
Mac systems provide a general mechanism for associating specific file types with an application that will be used by default to open the file. When the Finder icon for a file is double-clicked, if the file's type is associated with an application the application will be run, if it is not already running, and the application will be signaled to open the selected file.
A file's type is identified by its extension - the part of the name following the last period ('.') character - which, for image files, is typically a three character acronymn for the file format. For example, for Portable Network Graphics (PNG) files the filename extension is expected to be "png"; and for JPEG2000 (JP2) files the extension is expected to be "jp2". Upper and lowercase filename extensions are treated the same.
Mac systems will, by default, associate the image file types it knows about (and it knows about many) with the Preview application since it is capable of displaying images stored in many image file formats. The default file associate can be changed to an application that advertises to the system that it is capable of opening the corresponding file type.
In this example, the JP2 image file type will be associated with HiView:
After all JP2 files have been associated with HiView, double-clicking on a JP2 file icon in the Finder, or dragging the file from the Finder onto the HiView icon in the Dock, will run HiView and display the image. If HiView is already running the file will be displayed as if its pathname had been entered into the Source Location bar.
The image being displayed in the HiView Main Window may be saved in a local file. This is done using the Save Image dialog accessible from the Save.. item of the File menu.

The Save Image dialog is similar to the Open Image File dialog. It provides the same File Location Selection information and controls. This section is used to navigate to the directory where the image is to be saved and to specify the name of the image file that is to be written. If no extension is specified for the file name the file type will determine what is used. If a file exists with the selected name a confirmation dialog will be presented before overwriting the file.
The drop-down list of image file types indicates what types of image files HiView can write. Selecting an item from this list will filter out all files except the selected type, and directories, from the File Location Selection list. The file type selected will also determine the format that will be used when the image file is written. The last format selected will remain selected until changed, and this selection is remembered from one use of HiView to the next; i.e. once a preferred image file format has been selected it will always be used until changed.
Appended to the File Location Selection panel is a panel containing Output Image Size Controls with an Image Region Thumbnail. The thumbnail image is a copy of what appears in the Main Window Image Display Viewport. This is the image that will be saved; i.e. the region of the image appearing in the Image Display Viewport determines the region of the image that will saved in the file that is written. However, the size of the saved image may changed from what appears in the Image Display Viewport. Initially the size of the output image is set to be the same as the size of the image region in the Image Display Viewport in display pixel units. Controls are provided to change the width, height, and scale of the output image. The aspect ratio of the image remains unchanged, so whenever any size control value is changed the other values change accordingly. The maximum possible scale value is determined by the maximum image size that the software framework can render.
When the Save button is pressed a Saving Image dialog is presented that includes the file pathname and format type next to an Activity Indicator like that used in the Main Window when an image is being rendered. The output image will be rendered in a background thread; changes to the image rendered in the Image Display Viewport may done without affecting the image that is being saved. When rendering is complete the image data will be written to the selected file. Clicking on the Activity Indicator while the image is being rendered will cancel rendering and saving of the image. This could be useful if a remote JP2 image is being saved at a large size, but the network connection is found to be too slow such that obtaining all the source data for the large rendering is taking too long. However, once rendering has been completed writing the output image can not be interrupted. The Saving Image dialog will disappear when the image has been saved.
The output image is rendered at the specified scale to produce the image that appears in the Image Display Viewport at the specified size. For JP2 images the JPEG2000 rendering resolution closest to the specified scale is used to produce an output image with the best fidelity. For example, if the image region in the Image Display Viewport includes the entire area of a large source image, a large poster-sized output image can be produced that will be rendered at the best resolution for the specified size.